Access RGB Camera and Record Video
Device Compatibility
Currently, the RGB Camera is only supported on the following devices:
- XREAL Light
For those devices that do not support the RGB Camera, you can record the virtual content in the scene.
Developer Guide
Import the NRSDK
Import NRSDKForUnity.unitypackage.
Open the Sample Scene
Navigate to the Unity Project window and locate the CameraCaptureDemo sample in the following directory: Assets > NRSDK > Demos > RGBCamera-Record.
To integrate this functionality into your scene, instantiate the "VideoCaptureExample" GameObject as a prefab and add it to your scene hierarchy.

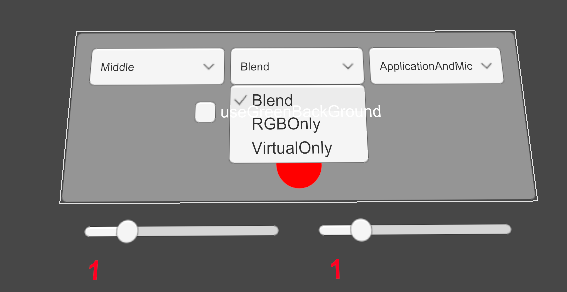
Configure the Blend Mode parameter according to your specific requirements:
- Blend: Captures both the RGB Camera feed and the real-world environment.
- RGB Only: Records only the RGB Camera content.
- Virtual Only: Captures exclusively the virtual content within the scene.

Inspect the Sample Code
- See
CameraCaptureController.cs, located inAssets/NRSDK/Demos/RGBCamera/Scripts/CameraCaptureController.csfor an example on how to get the texture of RGB Camera.
public RawImage CaptureImage;

 private void Start()
 {
     RGBCamTexture = new NRRGBCamTexture();
     CaptureImage.texture = RGBCamTexture.GetTexture();
     RGBCamTexture.Play();
 }
- See
VideoCapture2LocalExample.cs, located inAssets/NRSDK/Demos/Record/Scriptsfor an example on how to implement video capture
// A video Capture Example
public class VideoCapture2LocalExample : MonoBehaviour
{
    /// <summary> The previewer. </summary>
 public NRPreviewer Previewer;
 public VideoRecordConfigPanel m_ConfigPanel;

 /// <summary> Save the video to Application.persistentDataPath. </summary>
 /// <value> The full pathname of the video save file. </value>
 public string VideoSavePath
 {
     get
     {
         string timeStamp = Time.time.ToString().Replace(".", "").Replace(":", "");
         string filename = string.Format("Nreal_Record_{0}.mp4", timeStamp);
         return Path.Combine(Application.persistentDataPath, filename);
     }
 }

 /// <summary> The video capture. </summary>
 NRVideoCapture m_VideoCapture = null;

 /// <summary> Starts this object. </summary>
 void Start()
 {
     CreateVideoCaptureTest();
 }

 /// <summary> Tests create video capture. </summary>
 void CreateVideoCaptureTest()
 {
     NRVideoCapture.CreateAsync(false, delegate (NRVideoCapture videoCapture)
     {
         NRDebugger.Info("Created VideoCapture Instance!");
         if (videoCapture != null)
         {
             m_VideoCapture = videoCapture;
         }
         else
         {
             NRDebugger.Error("Failed to create VideoCapture Instance!");
         }
     });
 }

 /// <summary> Starts video capture. </summary>
 public void StartVideoCapture()
 {
     if (m_VideoCapture != null)
     {
         CameraParameters cameraParameters = new CameraParameters();
         if (m_ConfigPanel == null)
         {
             Resolution cameraResolution = NRVideoCapture.SupportedResolutions.OrderByDescending((res) => res.width * res.height).First();
             cameraParameters.hologramOpacity = 0.0f;
             cameraParameters.frameRate = cameraResolution.refreshRate;
             cameraParameters.cameraResolutionWidth = cameraResolution.width;
             cameraParameters.cameraResolutionHeight = cameraResolution.height;
             cameraParameters.pixelFormat = CapturePixelFormat.BGRA32;
             // Set the blend mode.
             cameraParameters.blendMode = BlendMode.Blend;
             // Set audio state, audio record needs the permission of "android.permission.RECORD_AUDIO",
             // Add it to your "AndroidManifest.xml" file in "Assets/Plugin".
             cameraParameters.audioState = NRVideoCapture.AudioState.MicAudio;
         }
         else
         {
             cameraParameters = m_ConfigPanel.GetRecordConfigration();
         }

         m_VideoCapture.StartVideoModeAsync(cameraParameters, OnStartedVideoCaptureMode);
     }
 }

 /// <summary> Stops video capture. </summary>
 public void StopVideoCapture()
 {
     if (m_VideoCapture == null)
     {
         return;
     }

     NRDebugger.Info("Stop Video Capture!");
     m_VideoCapture.StopRecordingAsync(OnStoppedRecordingVideo);
     Previewer.SetData(m_VideoCapture.PreviewTexture, false);
 }

 /// <summary> Executes the 'started video capture mode' action. </summary>
 /// <param name="result"> The result.</param>
 void OnStartedVideoCaptureMode(NRVideoCapture.VideoCaptureResult result)
 {
     if (!result.success)
     {
         NRDebugger.Info("Started Video Capture Mode faild!");
         return;
     }

     NRDebugger.Info("Started Video Capture Mode!");
     m_VideoCapture.StartRecordingAsync(VideoSavePath, OnStartedRecordingVideo);
     // Set preview texture.
     Previewer.SetData(m_VideoCapture.PreviewTexture, true);
 }

 /// <summary> Executes the 'started recording video' action. </summary>
 /// <param name="result"> The result.</param>
 void OnStartedRecordingVideo(NRVideoCapture.VideoCaptureResult result)
 {
     if (!result.success)
     {
         NRDebugger.Info("Started Recording Video Faild!");
         return;
     }

     NRDebugger.Info("Started Recording Video!");
     if (m_ConfigPanel != null && m_ConfigPanel.UseGreenBackground)
     {
         // Set green background color.
         m_VideoCapture.GetContext().GetBehaviour().SetBackGroundColor(Color.green);
     }
 }

 /// <summary> Executes the 'stopped recording video' action. </summary>
 /// <param name="result"> The result.</param>
 void OnStoppedRecordingVideo(NRVideoCapture.VideoCaptureResult result)
 {
     if (!result.success)
     {
         NRDebugger.Info("Stopped Recording Video Faild!");
         return;
     }

     NRDebugger.Info("Stopped Recording Video!");
     m_VideoCapture.StopVideoModeAsync(OnStoppedVideoCaptureMode);
 }

 /// <summary> Executes the 'stopped video capture mode' action. </summary>
 /// <param name="result"> The result.</param>
 void OnStoppedVideoCaptureMode(NRVideoCapture.VideoCaptureResult result)
 {
     NRDebugger.Info("Stopped Video Capture Mode!");
 }
}
Build and Run the Sample App
- Audio record needs the permission of “android.permission.RECORD_AUDIO”, Add it to your “AndroidManifest.xml” file in “Assets/Plugin”.
- The Previewer is used to preview live images in real time, for debugging purposes. Click the APP key of the controller to show or hide it.
- Click the Start button to start video capture.
- Click the Stop button to stop video capture. It will save the video file to “Application.persistentDataPath” path.